After each successful donation, you have the option of what you'd like to happen. With each option, different customizations are available. You can also have a different method for each donation form, which could be handy depending on your goals.
Note, this option is only available to users on our Starter, Team or Enterprise Plans. If you are a Legacy or Free Plan user, click here to upgrade from your Donately dashboard and instantly get access to these extended options.
Read about both options below to determine which would work best for you:
- Keep the Donor on the Same Page
- Redirect the donor to a new URL
Option 1. Keep donor on the Same Page
This option will keep the donor on the same page, refreshing the frame in which the donation takes place to show different content. By default, that frame looks like this:
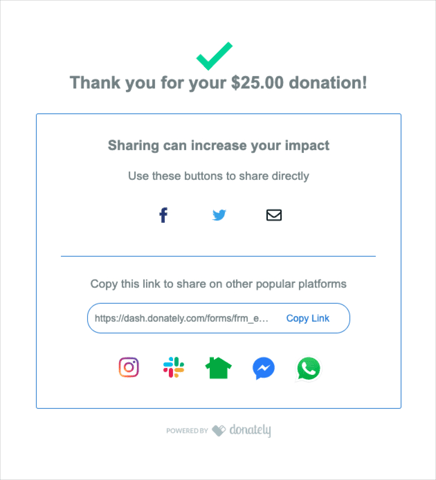
You have the ability to customize 5 pieces of this frame. Click on each below to learn more about each element:
- Page header
- Page subheader
- Social share URL
- Social share message (Twitter & Email only)
- Additional social media icons
Page header
The page header is the top line of text on the post-donation frame. By default, this line says:
"Thank you for your %{ {formatted_amount} }% donation!"
You can customize this line to say anything you'd like! If you would like to include the actual amount donated, you'll want to add in the variable
{ {formatted_amount} }
wherever you'd like the amount to go. For example, you could say:
"We appreciate your donation of %{ {formatted_amount} }%! Your gift goes a long way towards helping our goals."
Be sure to include a space before the first {, and either punctuation or a space after the last }. You will see a preview as you edit the form.
Page subheader
The page subheader is a smaller line just below the page header. By default, this line says:
"A receipt has been sent to {email}."
While you can add any text you'd like in here, we really recommend leaving this as is, as it's important to let the donor know to look out for a receipt in their email.
If you would like to edit, you'll need to use
{email}
wherever you'd like the donor's email to go. As with the amount variable, be sure to include a space before the first {, and either punctuation or a space after the last }. You will see a preview as you edit the form.
Social share URL
This is the URL that will be added to the pre-built social media post if shared using the Facebook, Twitter, or email buttons. Be default, this will load in the URL that the donation took place. This could include your own website if the form is embedded, or the Donately donation pages if you're using a Campaign or Fundraising page, for example.
If you'd like to customize the link that is shared, enter in the full URL here, including either http:// or https://.
Social share message
This is the message that will be pre-filled for the post if shared on either Twitter or via Email. Please note, Facebook does not allow for pre-filled messages, thus the content will be empty if shared via Facebook.
By default, the message is:
"I just supported [organization name] and their cause. Join me and help make an impact."
While this is a perfectly acceptable message, you may want to consider changing this text to be more personal to the specific cause. If you would like to include your organization's name in here, you can either type it in as is, else use
{ {social_share_account_title} }
to fill in your account name, though, it's likely easier just to type in your organization's name directly!
Additional social media icons
Finally, you can decide whether to display the additional social media links at the bottom of the frame. While these will not automatically created a sharable post like the Facebook, Twitter and Email icons above, these do take the donor directly to other popular platforms.
For reference, the platforms are (in order from left to right):
- Slack
- NextDoor
- Facebook Messenger
These can provide a helpful queue to donors that options exist in their other social media platforms for sharing about their donation, helping to unlock a further reach for your cause!
If you'd prefer that these icons are not included, however, simply toggle them off and the frame will end just below the URL.
Option 2. Redirect to a new URL
If you would rather redirect the donor to a completely new URL altogether after each successful donation, you can opt to do that instead. Simply change the top dropdown to "Redirect to a different URL", and enter the URL into the box that appears. Remember to include https:// or https:// for any URL.
This is a great option if you have a full thank you page for donations! You could even go a step further and build a specific thank you page for each Campaign, giving the donor relevant information for their donation per Campaign.
This is also a great option if you have custom tracking needs that you can set to fire on a specific page-view.
No matter the reasoning, we would recommend telling the donor that their donation was successful, and to be on the lookout for a receipt soon. While you cannot use the variables like %{ {amount_fomatted} }% or {email} to populate, you can likely get the same message across.
While not mandatory, we would also suggest including a prompt to have the donor share their donation on social media. Expanding your reach is vital, and donors are likely very proud of the donation they just made! This can be a great way to reach new donors and is a great way to cultivate a social media following.